

We’re continuing with our first-hand iBobber tutorial this week! Last time we learned how to charge the iBobber and play with some of its basic setup functions. Now we’re going to take it to the lake to sync it with an iPhone and see how the sonar and mapping functions work.

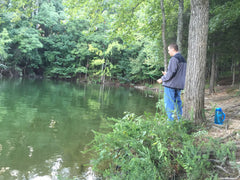
The Setting: I gave my iBobber its first test run at Tims Ford State Park in middle Tennessee on Tims Ford Lake. We picked a time in late afternoon to make sure no gawkers would wonder why I was casting a bobber with no lure attached, and the air temperature was a pleasant high-70s. For convenience, we parked at the marina and hopped across the parking lot to this cove off the Clifton Doyle Trail.

The Gear: I attached the iBobber to a seven-foot, medium-action Abu Garcia rod and Penn Z-series reel, pictured below. Both are almost as old as I am but have caught everything from bluegill and bass to seatrout and redfish. And of course, I brought my iPhone to sync with the iBobber and my fiancé Philip for good company.
First Impressions: I could definitely feel the iBobber's weight on the tip of my rod, which can handle 6-12 lb. line, so I didn't anticipate any issues with casting it. I used monofilament line for this test run, as it was already on the reel, but I plan on switching to braided line at the earliest opportunity.
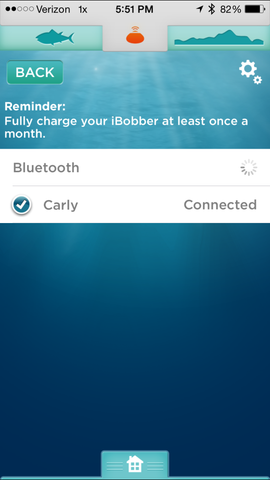
Syncing with the iPhone: Luckily, distance casting is not required to sync the iBobber with the iPhone. And actually, it's best to sync your iBobber before casting, either at home or close to shore. Since I live next to the lake, I got the best of both worlds. The first cast felt slightly awkward with the extra weight but perfectly manageable. Once the iBobber is in the water, you simply go under Settings on the iBobber app, tap on Bluetooth Sync, and tap where it says iBobber Disconnected:
Tap on the nickname you gave your iBobber when you first opened your phone app (My iBobber and I share a name. Creative, I know.), and it automatically connects using the Bluetooth Smart Technology.
 |
 |
Now that we’ve got our iBobber synced, let’s look at some of the functions of the smartphone app.
Sonar: This one is pretty self-explanatory. You cast the iBobber, which quickly gets easier once you know to expect the extra weight, let it sit, and look at your phone. The screen shows a rough outline of the waterbed, water depth, and if the iBobber detects anything shaped like a fish. The screen is split into 4 columns, and the most current sonar ping is on the left. The scree slowly scrolls to the left after each second, so one full screen holds the current sonar, -1 second, -2 second, and -3 second sonar. I knew that the cove was shallow, so I didn’t see too many fish at first.
However, I knew that fish were there, because Philip was getting nibbles on his fly rod from minnows and tiny bluegill. Most likely I was simply casting into parts of the cove lacking enough structure to attract the small fish. We’ll re-visit this feature momentarily.
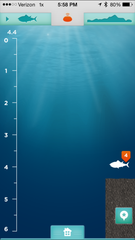
Waterbed Mapping: This feature is one of my favorites with the iBobber and one that you don’t get with boat-mounted fish finders. You select Waterbed on the app, it prompts you to cast the iBobber, and it gives you a countdown to start reeling it in. This is what my first attempt looked like:

You can see distance on the horizontal axis and water depth on the vertical axis, and the results were exactly as expected. The iBobber showed that I had casted it into deeper water and reeled it along a fairly gradual slope back to shore.
We quickly realized that this cove was not the ideal testing ground for the iBobber or any of our rods, thanks to all the low-hanging branches and limited shoreline. So we moved to the boat dock, which was empty now that the marina was closed for the day.
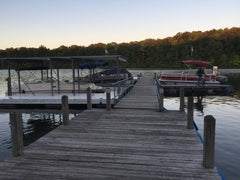
I got a much better feel for casting the iBobber once I didn’t have to worry about watching for low-hanging branches. The Sonar really shines in deep, open water, and it revealed steep drop-offs that I would not have known existed and would have been more challenging to fish. The extra weight of the iBobber worked with me to propel the device farther out into the open water, and I finally saw what I was looking for: FISH!
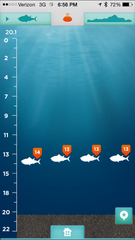
The Sonar showed fish about 13-14 feet in depth, and if I were fishing from a kayak or boat, I would know to switch to sinking lures that can drag along the bottom and grab the fish’s attention. Recall that the screen scrolls to the left, so this reading was most likely one or two fish swimming along the same depth. If the fish were closer to the surface, I would use minnows or artificial surface lures. The orange tag on the fish icons means that the fish were under 15”, so the most likely candidates for this lake were bluegill, small bass, or crappie. As I kept probing with the iBobber, I found more small fish close to the bottom, and the Sonar even pointed out the presence of vegetation. In the screen below, I was probably looking at one fish around 20 feet deep and another one at 25 feet.

The Verdict: Overall, I’m incredibly impressed with the user-friendliness of the iBobber and its smartphone app. I can definitely feel its weight when I cast, but I had no problem adjusting my technique to cover plenty of distance. However, it makes me wonder how people actually manage to cast smartphone fish finders that are larger than the iBobber. The iBobber requires a minimum depth of 6 feet according to the user manual, but the Sonar really shines in deeper water to point out sharp dropoffs and help you decide between surface bait and sinking bait. I could (and will) write an entire blog post about the various applications for the Waterbed feature, but it works great at showing the various ledges and structures that could attract fish. I found that my iPhone didn’t go back into sleep mode as long as I left the iBobber app open, but I used about 10% of my battery in just over an hour. I love not having to constantly re-enter my passcode every time I want to check the app, but I recommend having a full phone charge for all-day excursions.
In the next blog, I’ll take the iBobber on the lake for some kayak fishing and put it through its paces. For now, happy fishing!